
To learn how Kubernetes works you should run your own Kubernetes cluster on bare-metal hardware.
In the world that I live in Kubernetes is all the rage. This is the world of professional software development and deployment where medium- and large-sized companies are trying to reduce cost and complexity of their IT platforms while at the same time becoming faster at making changes to the software that they run as services to either their internal or external customers. I’ve been on the side of development teams consuming Kubernetes myself and I was impressed and delighted by its concept of “desired state” represented by simple manifest files that me and my team were maintaining for the applications that we built. Later I switched roles and became a Kubernetes engineer myself, now helping platform teams delivering Kubernetes to development teams. If you’re eager to learn how Kubernetes works internally and what a complex system it is that makes it so simple to deliver applications then this blog post is for you. Because I deeply believe that in order to learn how Kubernetes works you should run your own Kubernetes cluster on bare-metal hardware.
Taking first steps with Kubernetes is easier today than it has ever been: My favorite project for quickly spinning up a cluster is kind, Kubernetes in Docker. Run kind create cluster and after a couple of seconds your cluster is ready to go. There’s various alternatives out there, too, with microk8s, k3s and minikube being the most prominent ones. This got me started easily and quickly with Kubernetes development back when I switched roles. However, later on, when I was involved in more complex product development around Kubernetes, building controllers and maintaining an enterprise-grade Kubernetes distribution at D2iQ, I needed to get more intimate with the internals. I wanted to understand all the intricacies of it, what happened under the hood when I ran kubectl apply -f my-awesome-app.yaml, how traffic is ingested into a cluster and further routed to the right container, how DNS works in the cluster, what all the possible ways were to provide persistent storage to containers, how a cluster is properly secured from unauthorized access etc. etc.
At that point I figured I needed to run my own cluster at home on bare-metal hardware and dig really deep into the details of keeping a Kubernetes cluster up 24/7, serving applications to the Internet and the internal home network in a secure fashion. That was nearly 3 years ago when Raspberry Pis were still affordable enough that I could just grab a handful and get going. I ordered 4 Rpi 4s with 4 GByte of RAM in addition to the various older RPis I already owned, the awesome 8-slot transparent cluster case from C4 Labs, a cheap 8-port Ethernet switch, a couple of Cat 6 Ethernet cables and a 6-port USB power adapter.
Setting Goals
I quickly figured I needed to set clear expectations of how the cluster would be used so I set myself some goals:
- It should run on a separate network, isolated from the rest of my home network for security purposes.
- It should be possible to expose services from inside the cluster to my home network but not the Internet.
- It should be possible to expose services from inside the cluster to the Internet.
- The API server should be reachable from inside the cluster’s LAN as well as from inside my home LAN but not from the Internet.
- It doesn’t need to be highly available so running a single control-plane node is good enough as a start.
From these goals I derived a couple of designations for each of the nodes on the cluster network:
- 1 router for bridging the cluster network and my home LAN.
- 1 control-plane node for both etcd and the Kubernetes control-plane components.
- 3 worker nodes.
- 1 machine for providing storage to the cluster using NFS.
The Final Architecture
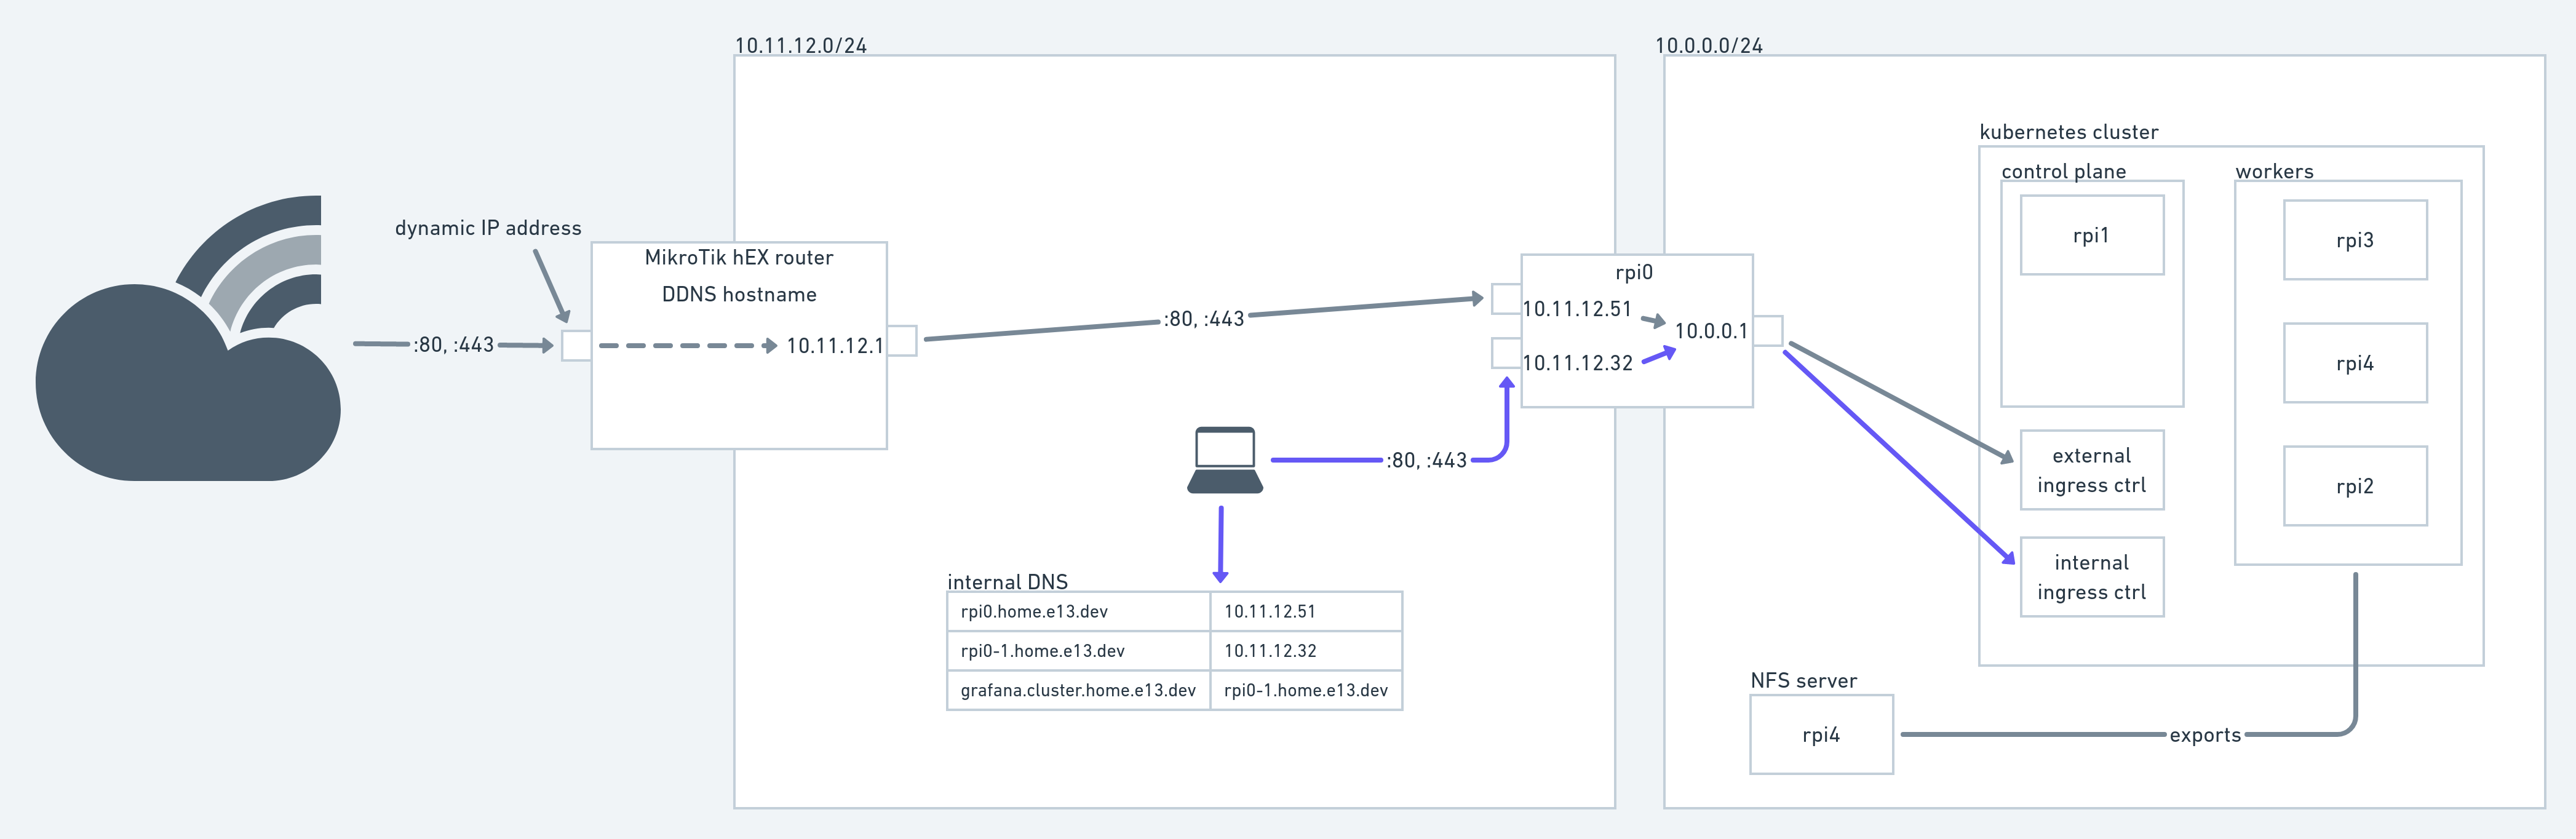
The final architecture of my Kubernetes bare-metal cluster
In the image above you see all the components that currently make up my home Kubernetes cluster. Everything in the 10.0.0.0/24 LAN is pretty standard with one node serving as control plane and 3 others serving as workers. All of the Kubernetes nodes are running an LTS Ubuntu version and are manually provisioned. I built some scripting around setting up default firewall rules, SSH access and a couple of other configuration items. Automating the node provisioning is still on my list. An additional node (running Debian, I don’t recall why) has an SSD attached and serves it over NFS. More on that later.
Kubernetes
As one of my goals was to learn Kubernetes the hard way (not Kelsey Hightower style, though), I used kubeadm to get the cluster going and that’s still the tool I use to maintain it, e.g. when upgrading the K8s version. The configuration doesn’t deviate too much from kubeadm’s defaults which is good enough for my needs.
Even though I’m the only user of that cluster at the moment, I did want to make it “tenant-aware” in the sense that there’s a rather simple way to manage users. In the beginning I just created certificates for each user manually but I moved on and now user management is offloaded to a Keycloak instance I’m running on a hosted server. Configuring Kubernetes’ API server for OpenID Connect isn’t extremely complicated but you need figure out the right knobs. Here’s an excerpt from my kubeadm configuration:
apiVersion: v1
kind: ConfigMap
metadata:
  name: kubeadm-config
  namespace: kube-system
data:
  ClusterConfiguration: |
    apiServer:
      certSANs:
      - apiserver.cluster.home.e13.dev
      extraArgs:
[...]
        authorization-mode: Node,RBAC
        oidc-client-id: k8s-apiserver
        oidc-groups-claim: groups
        oidc-issuer-url: https://##REDACTED##/realms/e13
        oidc-username-claim: email
[...]
For client-side OIDC support I have installed the kubelogin kubectl plugin. After having set these up I created some RoleBindings to provide the respective users/groups access to API resources (the RoleBinding manifests are all maintained in Git, more on that later).
Upgrading to the latest Kubernetes version is probably the most tedious task at the moment as I haven’t automated any of that so it’s mostly following the upgrade guide.
Network
The 10.0.0.0/24 network is a simple switched network using a cheap tp-link 8-port gigabit switch. The other network, 10.11.12.0/24 is my home LAN for all devices that need Internet connectivity, the Playstation 4, Echo devices, smartphones and laptops. We have Ethernet outlets in each room of our house and a 24-port gigabit switch in the basement. For wireless connectivity I have several wifi APs running in the house that operate on the same network. A MikroTik hEX router together with a VDSL modem provides Internet access. It serves IP addresses for Ethernet and wifi devices, acts as router and DNS server. It provides DDNS capabilities capabilities out of the box and I’m using a DNS CNAME entry to get traffic from outside into the network. You’ll see it in action when accessing home.e13.dev (nothing fancy there, though).
Traffic Out
As you can see in the architecture diagram above, another Raspi (“rpi0”. I’m too lazy to come up with a fancy naming scheme so all Raspis are just enumerated.) serves as router between the home LAN and the cluster LAN. It has two physical Ethernet interfaces (one provided through a USB-to-Ethernet adapter) and a MACVLAN interface. A pretty good explanation of the different virtual networking options you have on Linux is provided over at the Red Hat Developer portal. Creating a MACVLAN interface with NetworkManager is pretty simple:
$ nmcli c add ifname veth0 autoconnect yes save yes type macvlan dev eth1 mode bridge
$ nmcli con modify macvlan-veth0 ipv4.dhcp-hostname "rpi0-1"
I’m not sure if there’s a way to incorporate the second command into the first one but this is good enough for my needs. Now two of the interfaces are part of the home LAN (that provides Internet access) and the third one is part of the cluster LAN. The home LAN interfaces just use DHCP to get their IP configuration from the MikroTik router.
To the cluster LAN rpi0 serves as DHCP and DNS server using the awesome dnsmasq. Dnsmasq automatically serves the host it’s running on as default route. The domain of all cluster nodes is set by dnsmasq using the domain=cluster.home.e13.dev parameter. Now to make rpi0 actually work as a NAT gateway for the cluster LAN hosts, the Linux firewall (aka iptables) needs to be properly configured. This was the hardest part for me as I’m not at all proficient in iptables. I would rather defer to your favorite search engine for finding out how to do that instead of giving potentially wrong advice. Suffice to know that my setup works (though it might not be the most efficient or secure).
Traffic In
Now the cluster nodes have Internet access through rpi0 but we also want to connect to services running in the cluster, e.g. a Grafana instance or any other web application deployed in Kubernetes. The usual way to expose a service in Kubernetes is to create a LoadBalancer type Service resource. If you’re running Kubernetes on one of the major cloud providers this is all you need to do to get a public IP address or hostname assigned to the service. On bare metal, though, this is not the case. This is where MetalLB enters the stage. Running in a cluster it takes care of assigning IP addresses and setting up the network layer of the nodes to direct traffic to those IP addresses to the right pods. On my cluster I’m using the (simpler) Layer 2 mode for advertising services and I set aside a part of the 10.0.0.0/24 address space to MetalLB (which I excluded from dnsmasq’s DHCP server for assignment).
Next, traffic coming from outside of the cluster network needs to be proxied to each LoadBalancer IP address. For this to work I created my own little transport layer proxy configured simply through YAML files. It also ships with a service-announcer tool that generates l4proxy configuration files based on Kubernetes LoadBalancer-type Service resources it finds on the cluster. L4proxy then just binds to a configured interface and proxies the connections to one of the LoadBalancer services’ IP addresses.
L4proxy runs on both home LAN interfaces so that I can selectively forward traffic from either of the two home LAN interfaces on rpi0. Each of these interfaces has a specific dedication: One is only reachable from the home LAN (the one that has 10.11.12.32 assigned to it in the diagram above) so that I can constrain e.g. my smart home Grafana instance to LAN machines. The other interface receives traffic forwarded from the MikroTik Internet router that forwards all traffic directed at the DDNS domain to rpi0’s interface (10.11.12.51 in the diagram).
Now that we have all the network shenanigans behind us we need to let Kubernetes know about the incoming traffic and where to direct it. As I said above MetalLB picks up LoadBalancer Services but there’s no need to create those yourself when you’re using an ingress controller. I opted for ingress-nginx, mainly for its simplicity. It creates a LoadBalancer service and directs traffic based on Ingress resources. You can read all about Ingresses in the wonderful Kubernetes documentation.
IngressClass configuration with ingress-nginx
I have two instances of ingress-nginx running on the cluster, one for external traffic and one for internal traffic. Two different IngressClass resources, “ingress-nginx” and “ingress-nginx-internal” let each Ingress choose whether it should be exposed internally or externally. This is what the Helm values look like for the internal ingress-nginx controller:
    controller:
      electionID: ingress-controller-internal-leader
      ingressClass: nginx-internal
      ingressClassResource:
        name: internal-nginx
        enabled: true
        default: false
        controllerValue: "k8s.io/internal-nginx"
One important thing I only figured out later on is that I needed to set the electionID parameters of each Helm release to a different value so that both instances don’t conflict with each other for leader election.
DNS
There is actually one last thing left to do: resolve host names defined in the Ingress resources to either the IP address of the internally facing rpi0 interface or the publicly facing ISP-assigned IP address of the MikroTik router. For internal services I merely maintain a list of static DNS entries on the MikroTik router. Each internal service, e.g. grafana.cluster.home.e13.dev is backed by a CNAME entry in turn resolving to the internal rpi0 interface. By using a CNAME I don’t have to change all DNS entries whenever that interface’s IP address changes. For externally facing services I maintain DNS entries at my DNS provider. Those also are just CNAME entries resolving to the DDNS name of my MikroTik.
Storage
I’m running a couple of stateful applications on my cluster, e.g. Grafana and some internal applications backed by SQL databases. This state needs to be persisted somewhere. In my search for a simple yet production-ready solution I chose to bet on NFS because it is very simple to set up and PersistentVolume provisioning in Kubernetes is easy to get using the Kubernetes NFS Subdir External Provisioner. The latter provides all resources to get going quickly. All my stateful data is backed by a PV provisioned from NFS at the moment. Before you do this on your own cluster, though, be aware of the following caveats:
- NFS is inherently insecure: It doesn’t provide transit encryption of traffic or access control mechanisms. This guide by the linux documentation project provides details on the security aspects of NFS.
- I found that NFS-backed PVs respond pretty badly to unscheduled node restarts. When a node goes down unexpectedly the pods can’t be automatically moved to another one because they are stuck in Terminating state until I restore the node. I haven’t found a solution to this, yet.
- When the NFS server goes down, NFS mounts on nodes might get stuck without any ability to restore them other than rebooting the node. I managed to mitigate this a little by instructing the provisioner to use soft mounts. Those have a couple of drawbacks, though, so you might want to understand the implications before doing that yourself.
I would never serve any serious production data from NFS shares but it’s good enough for my home setup, especially since all the other solutions out there seem to require a lot more work to get setup and they consume more resources on the cluster nodes.
At the moment the NFS storage has no backup. I’m manually creating DB backups of all the PostgreSQL databases from time to time but all other data might get lost once the NFS disk dies. This is something I still need to improve.
Day 2 Operations: GitOps/Flux
Given that the cluster setup is a little flaky, especially with only one control plane node, I wanted to operate it with the assumption that it might go down any day. (The disk will die some day!) This led me to store all the Kubernetes resources in Git and having Flux manage them for me. This way, I can easily restore all the applications from that Git repo in case I need to setup a new cluster.
Takeaways
I did learn an awful lot in the last couple of years operating this cluster. I had downtimes for the strangest reasons, I replaced the CNI provider once while the cluster was running, I lost data by accidentally deleting a PV with a Delete ReclaimPolicy and I probably forgot a couple of other issues I ran into (and very likely caused myself). As you can see from the list above running your own Kubernetes cluster at home and using it for anything serious is a lot of upfront work. It also is a lot of regular maintenance work. You need to keep the OS on each node up-to-date, you need to update Kubernetes from time to time, exchange dying nodes, restore data after disk failures. You’ll occasionally be opening your browser only to see that your app is down for some strange reason.
For me that was the whole purpose of the exercise and it helps me improve in my day-to-day job as a Kubernetes engineer and Flux maintainer.